# Live-Chat with SvelteKit and SocketIO
Hi! 👋
Today we're taking a look at Socket.IO and how we can integrate it into our SvelteKit project. As an example, we'll be building a realtime chat app in this demo.
## Setup the project
First, we need a SvelteKit project. If you already have a project, you can skip this step. If not, you can simply create one with the following commands:
```bash
npm init svelte@next live-chat-app
cd live-chat-app
npm install
npm run dev -- --open
```
I'm using Tailwind CSS in this demo. I've already written an article on [how to add Tailwind CSS to SvelteKit](https://linu.us/sveltekit-with-tailwindcss-v3).
## Install the dependencies
All we need is Socket.IO for the server-side part (handling the incoming requests and connections) and the Socket.IO-Client for the client-side part (sending and receiving messages).
```bash
npm i socket.io socket.io-client
```
## Inject the Socket.IO server
We can inject the Socket.IO server directly in the SvelteKit config:
```js
// ... (other imports here)
import { Server } from 'socket.io'; // <-- Import the Socket.IO server
const config = {
// ...
kit: {
adapter: adapter(),
vite: {
plugins: [
{
name: 'sveltekit-socket-io',
configureServer(server) {
const io = new Server(server.httpServer);
// Socket.IO stuff goes here
console.log('SocketIO injected');
}
}
]
}
},
// ...
};
export default config;
```
## Server-side part
For this demo, I'll keep things simple and generate a random username for each client and just broadcast incoming messages along with the username and time.
```js
// This is located in the svelte config (see above "Socket.IO stuff goes here")
io.on('connection', (socket) => {
// Generate a random username and send it to the client to display it
let username = `User ${Math.round(Math.random() * 999999)}`;
socket.emit('name', username);
// Receive incoming messages and broadcast them
socket.on('message', (message) => {
io.emit('message', {
from: username,
message: message,
time: new Date().toLocaleString()
});
});
});
```
Please note: This guide is not a full Socket.IO guide. The example is pretty simple and only to show you how to use Socket.IO with SvelteKit.
## Client-Side part
### Connect to Socket.IO
Because you may want to use the Socket.IO connection in multiple components or pages, I recommend to separate the connection stuff:
```js
// src/lib/realtime.js
import ioClient from "socket.io-client";
const ENDPOINT = "http://localhost:3000";
const socket = ioClient(ENDPOINT)
export const io = socket
```
Now we can import and use `io` everywhere in our project.
### Layout
Before we add Socket.IO to the client-side, I'll create a simple UI for our demo. Because this is only the chat, I'll do this directly in the `src/routes/index.svelte`:
```html
My Chat app{username}
{#each messages as message}
{message.from}{message.time}
{message.message}
{/each}
```
As you can see, I'm storing all messages inside the `messages` array and output them inside the `each` loop.
To send messages, I've attached a listener to the form `sendMessage`.
### Send messages
First, we need to import `io` from the file we just created (realtime.js).
In our send function, we can simply trigger the `message` event (that's how we called it in the server-side part) with the message:
```html
```
### Receive messages
To receive messages, we need to listen to the `message` event (that's how we called it in the server-side part). The object we receive is the same object we sent (server-side) and we can just add it to the `messages` array:
```js
```
---
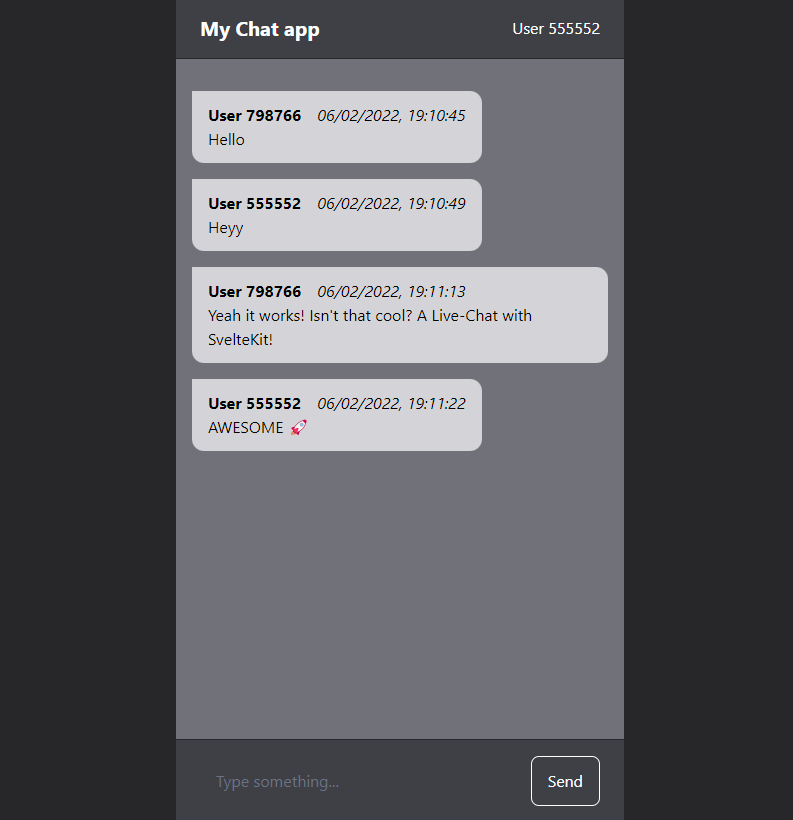
Now, run `npm run dev` and test it out:
---
## Make it work in production
The configuration above works perfectly in development environments (npm run dev), but didn't really work in production environments, so here is a quick guide on how to make it work in both development and production environments:
Make sure you use the `adapter-node` and create a `server.js` file. Here we can create our own express server and add SvelteKit to it using the handlers in the `build` directory (created by the adapter-node). In here, we can then inject SocketIO:
```js
// server.js
import http from "http";
import { handler } from './build/handler.js'; // <- Import SvelteKit handlers
import injectSocketIO from "./socket-handler.js"; // The SocketIO stuff (see next step)
import express from 'express';
const app = express();
const server = http.createServer(app);
// Inject SocketIO
injectSocketIO(server)
// SvelteKit handlers
app.use(handler);
server.listen(3000, () => {
console.log('Running on http://localhost:3000');
});
```
To eliminate code duplication, extract the SocketIO stuff from the `sveltekit.config.js` to a new file `socket-handler.js`:
```js
// socket-handler.js
import { Server } from "socket.io";
export default function injectSocketIO(server) {
const io = new Server(server);
// Socket.IO stuff goes here
io.on('connection', (socket) => {
// Generate a random username and send it to the client to display it
let username = `User ${Math.round(Math.random() * 999999)}`;
socket.emit('name', username);
// Receive incoming messages and broadcast them
socket.on('message', (message) => {
io.emit('message', {
from: username,
message: message,
time: new Date().toLocaleString()
});
});
});
console.log('SocketIO injected');
}
```
And now use this function in the SvelteKit config as well so it works in both dev and production environments:
```js
import adapter from '@sveltejs/adapter-node';
import injectSocketIO from "./socket-handler.js"; // <- Import the new function
/** @type {import('@sveltejs/kit').Config} */
const config = {
kit: {
adapter: adapter(),
vite: {
plugins: [
{
name: "sveltekit-socket-io",
configureServer(server) {
injectSocketIO(server.httpServer); // <- call the function here
}
}
]
}
}
};
export default config;
```
Now, to run the server:
```bash
# Dev
npm run dev
# Production
npm run build
node server.js
```
---
And that's it - now you can send data in realtime between the server and the client! 🚀
Thanks for reading and have a great day 🤗