Live-Chat with SvelteKit and SocketIO
Add Socket.IO to your SvelteKit project and use the full power of realtime communication

Hey there, I'm a young developer building software on the web. Currently building snippet.land and Tubitor.
Hi! 👋
Today we're taking a look at Socket.IO and how we can integrate it into our SvelteKit project. As an example, we'll be building a realtime chat app in this demo.
Setup the project
First, we need a SvelteKit project. If you already have a project, you can skip this step. If not, you can simply create one with the following commands:
npm init svelte@next live-chat-app
cd live-chat-app
npm install
npm run dev -- --open
I'm using Tailwind CSS in this demo. I've already written an article on how to add Tailwind CSS to SvelteKit.
Install the dependencies
All we need is Socket.IO for the server-side part (handling the incoming requests and connections) and the Socket.IO-Client for the client-side part (sending and receiving messages).
npm i socket.io socket.io-client
Inject the Socket.IO server
We can inject the Socket.IO server directly in the SvelteKit config:
// ... (other imports here)
import { Server } from 'socket.io'; // <-- Import the Socket.IO server

const config = {
    // ...

    kit: {
        adapter: adapter(),
        vite: {
            plugins: [
                {
                    name: 'sveltekit-socket-io',
                    configureServer(server) {
                        const io = new Server(server.httpServer);

                        // Socket.IO stuff goes here

                        console.log('SocketIO injected');
                    }
                }
            ]
        }
    },

    // ...
};

export default config;
Server-side part
For this demo, I'll keep things simple and generate a random username for each client and just broadcast incoming messages along with the username and time.
// This is located in the svelte config (see above "Socket.IO stuff goes here")
io.on('connection', (socket) => {
    // Generate a random username and send it to the client to display it
    let username = `User ${Math.round(Math.random() * 999999)}`;
    socket.emit('name', username);

    // Receive incoming messages and broadcast them
    socket.on('message', (message) => {
        io.emit('message', {
            from: username,
            message: message,
            time: new Date().toLocaleString()
        });
    });
});
Please note: This guide is not a full Socket.IO guide. The example is pretty simple and only to show you how to use Socket.IO with SvelteKit.
Client-Side part
Connect to Socket.IO
Because you may want to use the Socket.IO connection in multiple components or pages, I recommend to separate the connection stuff:
// src/lib/realtime.js
import ioClient from "socket.io-client";
const ENDPOINT = "http://localhost:3000";

const socket = ioClient(ENDPOINT)

export const io = socket
Now we can import and use io everywhere in our project.
Layout
Before we add Socket.IO to the client-side, I'll create a simple UI for our demo. Because this is only the chat, I'll do this directly in the src/routes/index.svelte:
<script>
    import { onMount } from "svelte";

    let textfield = ""
    let username = ""

    let messages = []

    function sendMessage() {

    }
</script>

<div class="h-screen w-screen bg-zinc-800">
    <div class="h-full w-full max-w-md mx-auto bg-zinc-500 flex flex-col">

        <header class="px-6 py-4 border-b border-zinc-800 bg-zinc-700 text-white shrink-0 flex items-center justify-between">
            <span class="font-bold text-xl">My Chat app</span>
            <span>{username}</span>
        </header>

        <div class="h-full w-full p-4">
            {#each messages as message}
                <div class="bg-zinc-300 rounded-xl rounded-tl-none px-4 py-3 my-4 w-fit">
                    <span class="flex items-center space-between gap-4">
                        <b>{message.from}</b>
                        <i>{message.time}</i>
                    </span>
                    {message.message}
                </div>
            {/each}
        </div>

        <form action="#" on:submit|preventDefault={sendMessage}
            class="px-6 py-4 border-t border-zinc-800 bg-zinc-700 text-white shrink-0 flex items-center"
        >
            <input type="text" bind:value={textfield} placeholder="Type something..." class="bg-transparent border-none px-4 py-3 w-full" />
            <button type="submit" class="shrink-0 border border-white rounded-lg px-4 py-3">Send</button>
        </form>

    </div>
</div>
As you can see, I'm storing all messages inside the messages array and output them inside the each loop.
To send messages, I've attached a listener to the form sendMessage.
Send messages
First, we need to import io from the file we just created (realtime.js).
In our send function, we can simply trigger the message event (that's how we called it in the server-side part) with the message:
<script lang="ts">
    import { io } from "$lib/realtime";
    import { onMount } from "svelte";

    let textfield = ""
    let username = ""

    let messages = []

    function sendMessage() {
        const message = textfield.trim()
        if(!message) return

        textfield = ""
        io.emit("message", message) // Send the message
    }
</script>
Receive messages
To receive messages, we need to listen to the message event (that's how we called it in the server-side part). The object we receive is the same object we sent (server-side) and we can just add it to the messages array:
<script lang="ts">
    import { io } from "$lib/realtime";
    import { onMount } from "svelte";

    let textfield = ""
    let username = ""

    let messages = []

    onMount(() => {
        io.on("message", message => { // Listen to the message event
            messages = [...messages, message]
        })
        io.on("name", name => { // Another listener for the name:
            username = name // Update the name so it can be displayed
        })
    })

    function sendMessage() {
        const message = textfield.trim()
        if(!message) return

        textfield = ""
        io.emit("message", message) // Send the message
    }
</script>
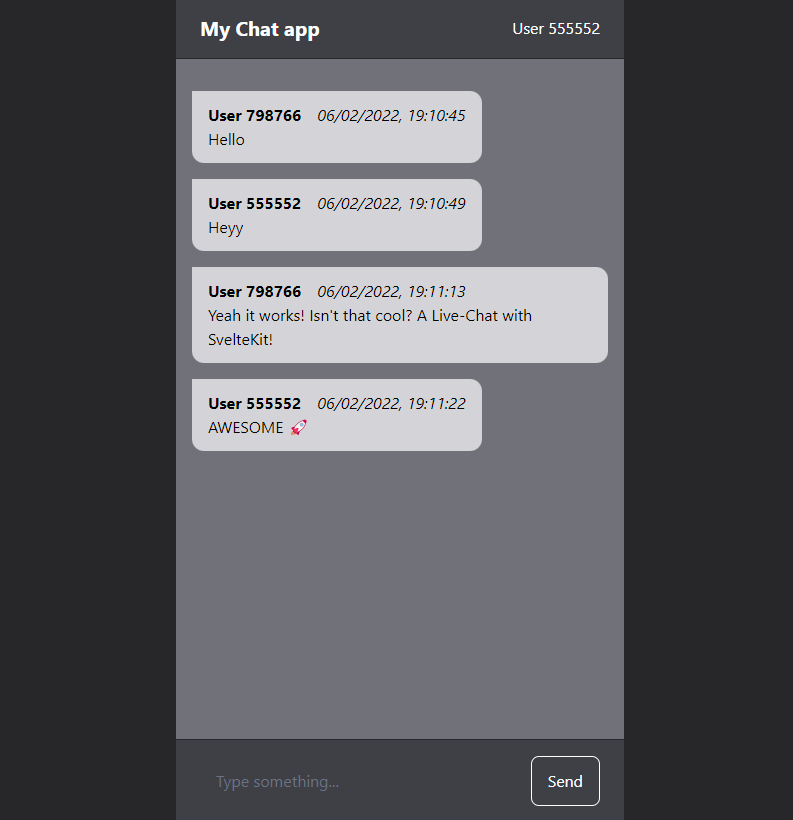
Now, run npm run dev and test it out:
Make it work in production
The configuration above works perfectly in development environments (npm run dev), but didn't really work in production environments, so here is a quick guide on how to make it work in both development and production environments:
Make sure you use the adapter-node and create a server.js file. Here we can create our own express server and add SvelteKit to it using the handlers in the build directory (created by the adapter-node). In here, we can then inject SocketIO:
// server.js
import http from "http";
import { handler } from './build/handler.js'; // <- Import SvelteKit handlers
import injectSocketIO from "./socket-handler.js"; // The SocketIO stuff (see next step)
import express from 'express';

const app = express();
const server = http.createServer(app);

// Inject SocketIO
injectSocketIO(server)

// SvelteKit handlers
app.use(handler);

server.listen(3000, () => {
  console.log('Running on http://localhost:3000');
});
To eliminate code duplication, extract the SocketIO stuff from the sveltekit.config.js to a new file socket-handler.js:
// socket-handler.js
import { Server } from "socket.io";

export default function injectSocketIO(server) {
    const io = new Server(server);

    // Socket.IO stuff goes here
    io.on('connection', (socket) => {
        // Generate a random username and send it to the client to display it
        let username = `User ${Math.round(Math.random() * 999999)}`;
        socket.emit('name', username);

        // Receive incoming messages and broadcast them
        socket.on('message', (message) => {
            io.emit('message', {
                from: username,
                message: message,
                time: new Date().toLocaleString()
            });
        });
    });

    console.log('SocketIO injected');
}
And now use this function in the SvelteKit config as well so it works in both dev and production environments:
import adapter from '@sveltejs/adapter-node';
import injectSocketIO from "./socket-handler.js"; // <- Import the new function

/** @type {import('@sveltejs/kit').Config} */
const config = {
    kit: {
        adapter: adapter(),
        vite: {
            plugins: [
                {
                    name: "sveltekit-socket-io",
                    configureServer(server) {
                        injectSocketIO(server.httpServer); // <- call the function here
                    }
                }
            ]
        }
    }
};

export default config;
Now, to run the server:
# Dev
npm run dev

# Production
npm run build
node server.js
And that's it - now you can send data in realtime between the server and the client! 🚀
Thanks for reading and have a great day 🤗